Wednesday, June 27, 2012

Today is the day!

I've been waiting patiently for 5 weeks now for the vertigo to go away.  Every day I hope that "today is the day"...  but it isn't.  I've come very close, only to relapse and feel worse again.  Well, today is the day I finally get to see a neurologist.  
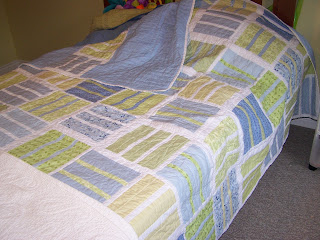
In the meantime, Sweetie came home from Barbados, and I started a new quilt!!  Yes.  I'm not sure what I'm going to call this one yet.  It is a rectangle and strip quilt.  I got the idea for it here.  But the actual quilt maker's blog is here.  She designed the quilt for a quilting magazine, and it can be found online here.  The only problem is the quilt size!  Why do people make all these small quilts?  I don't understand.  I want quilts that fit on beds.  So I've done the math...  you know how dangerous that can be!!  And I think I can do it with my bundle of Fat Quarters that I got on sale at Its Sew Time last fall.  I bought the bundle because there was a 40% off sale, and I just couldn't resist. It is a collection of 40 fat quarters from Oasis by 3 Sisters for Moda.  Beautiful.  Only problem is that there is no more.  That's it, only 40 fat quarters.  I've been hesitant to use it because there can be no miscalculations!!  I can't get anymore.  (if you look back at my previous quilts I believe I mention my frequent trips to the fabric store to get more....)  I also don't have any coordinating fabric for the back.  My plan is to do the front and then take it with me to find something that will work for the back.  
I did something else too.  I signed up for another Craftsy.com course!  I enjoyed the machine quilting one, and found it very valuable, so I wasn't hesitant to try another, especially when they offered me a great discount at $20 per course.  So the one I've signed up for is called Re-Piecing the Past.  It is a course to make a civil war era quilt.  But I'm not making the quilt.  I was curious when I read the description of the course about a technique she uses.  The course is taught by Kaye English.  She's a great quilt designer, maker and collector.  She used to have her own quilt shops but now she just teaches quilting around the US.  I believe she's from Kentucky somewhere.  So back to this "technique".  She refuses to iron!  She pieces her entire quilt without ironing or pinning.  Why?  Not because she is lazy, but because she finds the iron distorts her blocks!  I know!!!  So you start out with perfectly (or near perfectly) cut pieces, you carefully sew them using close to perfect 1/4 inch seams and after you iron your blocks they are all different sizes?  This is why my math doesn't work!  Its the iron that is causing my distortion- or so I hope to prove.  I'm going to make this quilt without ironing!  Well, without ironing the blocks until the quilt top is done.  I've ironed all the fat quarters prior to cutting.  And I'll carefully handle them while sewing to see if we can eliminate the distortion of the fabrics.
So far, this is what I've got:
my work space.  Love this portable table!

You can see my math sheet...  and my neat stack of rectangles and strips.

my stack of fat quarters on the floor... 

6 meters of Kona White...  and more jumbo spools of thread... oh, and a new blade for the cutter!

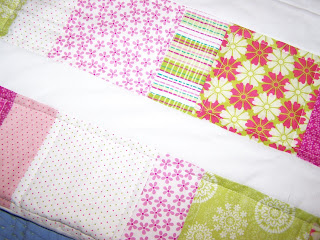
Love this pink print.  Looks vintage

My favourite of all the fat quarters...  getting ready to make the first cut.

So far, 18 of 36 fat quarters are cut.  I have a pile of blues, pinks and creams.  I still have taupe, red and yellow to do...

On a different note.  Today is also the day I age 5 years.  Yep.  Happy Birthday to me x 5.  Apparently there is a mix up with my Social Insurance Number and my birthday.  Today is the day I go get that fixed so that they know how old I really am.  Wish I could change everything to match the wrong date....  On the up side, maybe I can just have cake?  with vanilla frosting and sprinkles?

Monday, June 25, 2012

Bound in White

Finished!!  The Vanilla Frosted Triple Layer Cake Quilt is finished!!

White binding!!  I love it!!

All washed and crinkly... just the way I like my quilts!

Stripe on the back!

White binding on the front side!

So comfortable!  The puppy and I slept in it last night!
When I purchased the fabric, I had bought a medium blue fabric for a contrast binding, but as soon as the quilting was done and I layed it out to trim the excess, I knew that would be a big mistake.  I love the white in the quilt- the Vanilla Frosting!  I like how it helps show the offset of the blocks to lay out the pattern in it.  I felt that a contrast binding would take away from this, and really felt that white was the way to go.  Muffin was with me, and I only had a small piece of white fabric left.  We worked out the math, and I must have done it right because I had enough!!!  I have gone away from using 2 1/2 inch strips for binding, and opt for a more generous 3 inch strip.  Although that really only gives me an extra 1/8th of an inch after the folds, that is EXACTLY the amount that I need in order to be able to machine stitch my binding!  With the narrower strips, I found I had to do it by hand, because by machine I would fall off it so many times....  

So here we have it.  My first Full Size machine quilted quilt!  I love it.  I can't wait to work on the next one... but I have another project I need to finish first.  Hopefully, I'll be writing about that soon!


Wednesday, June 20, 2012

Better than strawberries and cream?

Since I can't have whipping cream, or custard (unless I make it myself), I've been eating just berries.  No more shortcakes, no more trifles.  Boo hoo...  I miss them!  Especially when strawberries come into season.  Not the ones you can buy all year round that are grown in some strawberry factory in the US, but good old fashion strawberries that are picked locally, and only are available at the end of June!  Well, the end of June is here...  so here is my latest blog entry:  BETTER than strawberries and cream.


Are you drooling yet?  Are you asking yourself : "What is that thick white cream she has? How can she do this without using dairy?"  Well, the answer is my favourite dairy substitute:  Coconut Milk.  Yep!

In the bottom a glass bowl (so that you can see the layers, I love this), add sliced strawberries, or any berry, fruit, or berry-fruit combination you would like.  The bottom layer of this one actually has a sliced banana...  its a surprise!  (well, unless you hate banana....)

I added some of the coconut sauce to cover the bottom layer of fruit- mainly because I fear my bananas might brown if I don't do this.  So, here's the coconut sauce recipe:

1 can coconut milk
1/4 cup  powdered sugar.

Mix them together.  Yep.  That's it.

The next layer in this delectable dessert is sliced angel food cake.  Angel food cake is naturally dairy free, and is almost gluten free as it involves very little flour compared to regular cake.  I bought my angel food cake because it is tedious to make and so easy to purchase!  Love the bakery section at SuperStore this time of year....  I could eat angel food cake for breakfast!!  Wait... I did...

On top of the cake, add some more sliced berries, then pour the rest of the delicious coconut sauce overtop.  The coconut sauce will soak into the cake, adding texture and flavour.  I've stored mine in the refrigerator until tonight's function, so that the coconut sauce firms up a bit.  Its going to be DELICIOUS!!  And best yet-  I can eat it!! I can have a bowl or even 2!!!  Yay for Dairy Free Desserts!!!

( I edited this to say powdered sugar instead of just sugar. I did use granulated sugar the first time and it worked out fine, but the powdered sugar dissolves a whole lot faster)

Monday, June 11, 2012

Lemony Mushroom Pasta

Well, with Sweetie being away, there hasn't been much cooking around here.  I picked up a pack of Portabella slices the other day and having been wanting to make something delicious with it.  While browsing Pinterest in the middle of the night, I came across a lovely picture of "lemon pasta", but read the recipe and realized it was mostly fresh parmesan cheese.  Of course, that would be delicious, but I've been battling vertigo and nausea for more than 2 weeks now.  Cramps and stomach distress aren't on my current "to do" list.  
So, I've started out with Olive oil and Earth Balance in a skillet.  Added a few cloves of minced garlic.  
Added my portabellas and my crimini mushrooms- about 1/2 pound of each, and sauteed gently, making sure not to burn my garlic.  Once they were starting to soften, I added 2 tbsp of lemon juice, and covered the whole skillet, until the mushrooms were soft and cooked.
Uncover and continue to cook until the liquid is down to about half.  For those of you who are not familiar with cooking with portabellas, the cooking liquid will turn a dark grey colour.  If you don't like the look of the dark grey, then use other types of mushrooms.  
Yummy...  Add a handful of chopped fresh basil, and remove from heat.
Serve over fresh pasta, with a handful of pine nuts on each plate.  The basil and the pine nuts are the main ingredients in pesto, so in fact you have a deconstructed pesto with lemon and mushrooms on pasta.  Enjoy!  Serve with cracked peppercorn and a slice of fresh bread if you want...  we didn't mull it over much.  We just ate!!

For dessert- how about  peek at the Vanilla Layer Cake Quilt?  

I've started quilting each individual block. I'm using 1.5" masking tape to mark my lines.  I love the end result.  3 squares done, only 69 left to go!

Friday, June 8, 2012

Layer Cake and Layer Cake

Vertigo is still my constant companion these days, so I am spending my days at home waiting for the phone to ring!  Hoping that someday soon, the specialist will want to see me.   Well, no sense wasting this time.  I've been working on the Vanilla Cake quilt!  
my layout!
I have 80 blocks.  72 of them will make up the quilt top. The other 8 will make a row across the back.  I have to piece it anyway, so I might as well make it pretty!  Now this quilt, with its 10 different fabrics is laid out mathematically.  I couldn't do it any other way without driving myself nuts.  Now the trick is, to maintain the pattern while picking up the rows and bringing them to the sewing machine!  
These are my first 3 rows.  I'm impressed by how well the blocks fit together, and how even my rows are!  I usually have a lot of "fudging" to do to make my quilt square.  This one impresses me.  Of course, as Muffin pointed out to me, none of my rows appear straight because of the offset block that I've created.  I like it.  Can't wait to have it all done!  I'm not sure yet how I will quilt this one.  Any suggestions as to quilting pattern?


Some of you might be concerned that my posts aren't involving much in the way of cooking or baking...  So, I thought I'd share a favourite recipe! 

Triple Layer Vanilla Cake  (or Cupcakes!)

Preheat oven to 350.  Line 20 to 24 cupcake molds

2 1/2 cups sifted flour
3       teaspoons baking powder
1       teaspoon salt
1 1/2  cups sugar
   1/2  cup butter at roomtemperature  (I'm using Earth Balance buttery sticks)
1 cup  milk
1     teaspoon vanilla  (or other flavour)
2     eggs unbeaten....


(Mix cake by hand or electric beater.  count only actual beating time or strokes, Scrape bowl and spoon or beater often)

Measure sifted flour into sifter.  add baking powder, salt,and sugar.  Stir shortening just to soften.  Sift in dry ingredients.  Add 3/4 cup of the milk and vanilla and mix until all flour is dampened.  Then beat 2 minutes at low speed of electric mixer or 300vigourous strokes by hand. Add eggs and remaining milk and beat 1 minute longer in mixer or 150 strokes by hand....

Bake ...Pour batter into pans... Bake in moderate oven (350) 20-25 minutes.  This cake may be baked in three round 8 inch pan  for 20 minutes or bake in two 8x8x2 pans 25 to 30minutes...

Frost with your favourite buttercream frosting AND SPRINKLES!!  Send me a picture of your creation please (or deliver me a slice...)
These are the ones I made for the Christmas bakesale at work.  They sure are yummy!

Monday, June 4, 2012

Small and Precious Things....

So, I've been working on this darling quilt for the past few days for a great family who have waited a long time for the blessing of having a child.  Prayers are answered, and this lovely family needs a quilt for their crib!  Before Wednesday of this week!!
Quilting by machine certainly speeds things up!  I've done some straight line quilting in this one, and then added a few design elements.. 
The back is very nice!  Here's a picture of it again:
Darn, I guess that one's not very clear.  It is in the washing machine now, so I'll have to wait until it is dry to retake that shot!    I just love it. I love the binding- I think it looks like candy around the edge of the quilt!  I love the hearts, and I love the flower prints, but my favourite print of all, is the small green and pink polkadot fabric.  Something about it being so delicate and so understated...
hmm... lots of glare...  
I hope to be able to deliver this tonight, and maybe give them a hand in putting that crib together! 

Okay, so it just came out of the dryer and I just LOVE it!!!  Wow, it is even nicer all washed and shrunken up!  Here are some more pictures:
The blanket stitch around the heart applique, and the outline quilting around the heart.
You can see the back of the heart quilting here.  Just love this little quilt!!
Doesn't it just look cozy? 
 I'm so very excited to give this quilt away, I know that it is going to be loved!  I'm looking forward to making a great quilt someday and keeping it so I can snuggle in it and nap.  Can't wait to finish the Vanilla Frosted Triple Layer Cake quilt now... 

Saturday, June 2, 2012

Adventures in Vertigo

So, back to me being gifted at math.  You know I have trophies, right?  Yes, I won math trophies all through highschool because I was not only excellent, but gifted at math.  The more complex a problem was, the more interested I was in finding the solution. I loved logic games, finding patterns, and just about anything else that was geeky and math like.  If there was a pattern in something, I was determined to figure out what it was.  I've stayed up late at night staring at my store bought factory made quilt trying to figure out what the pattern is for the blocks, and I can see where they've accidentally inverted a row.  Yes, it is quite the gift I have...
When making my own quilts, I have always been determined to have a pattern of repetition so that I can accurately figure out the fabric requirements and the even distribution of fabrics in my finished product producing a very balanced quilt. One where I can sleep in peace, not having to worry about figuring out what the pattern actually is before I can comfortably drift off.  
My fabric selection
Oops, forgot one...
So this is the quilt I started last night.  Let me just add that I don't usually work on quilts late into the night, but this onset of vertigo in the past week and the medications, seem to have disrupted my normal sleep habits.  Prednisone is quite the insomniant... 
The original layout.  Note the repeating lines, and patterns.
Well, looking at this, I felt a little dizzy... the zigzag staggered pattern of the fabrics just didn't sit well with me.  It is probably because of the vertigo, but I did something next that will shock Muffin and Cookie when they find out:  I moved the blocks around! I  moved them out of their designated spots AND their designated rows!  I know, CHAOS!  Others might just refer to it as randomness...
The end result:  The finished quilt top, and a piece for the back.  Totally random.
Well, I now have the back on, and it is pinned and ready for the machine.  Can't wait to see what it is like when it is done!  I have a fantastic fabric for the binding.